|
|
|
|
|||||||||||
|
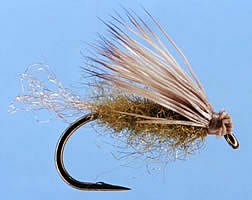
X-Caddis The X-Caddis was created by Craig Matthews around 1980 at Blue Ribbon Flies in Yellowstone, Montana. When Caddis are present, this fly will take fish all day long if fished drag-free using a floating line. It is an emerger or cripple imitation, so it pays not to to add floatant to the body or to the shuck, so that the fly achieves a “hang-down” attitude during the drift. Over time the fly morphed somewhat. The original was tied with beaver or muskrat for the body; artificial dubbings seem to be most popular now. More importantly, the Z-Lon shuck was originally tied in as a tail, and trimmed bluntly. Ralph Cutter and others observed that this type of shuck splayed out, making the artificial look unnatural. They tried instead a shuck made by twisting and looping the Z-Lon back to the hook to better represent the trailing bubble-like appearance of the shuck when viewed from the fish-eye perspective. For more information on this fly, and some tying techniques that are more technical than is appropriate for this column, go to www.fedflyfishers.org and click on their fly of the month or search for the X-Caddis on their site for an informative article by Wayne Luallen. |
|||||||||||||
|
Materials
|
Tying instructions1. Smash barb on hook, and cover hook shank with thread. When doing this, leave a blank area equal to two eye-widths just behind the eye. This is true for virtually all patterns. 2. Separate out about 9 or 10 fibers of Z-lon yarn. Secure one end of it at the front of your windings and trim the butts. Take the other end and twist it about 1 turn clockwise and secure it at the same spot as the first end. The length should be such that the shuck protrudes from the back of the hook about the width of the hood gap, or just a tad more. 3. Grab the shuck and twist it counter clockwise and hold it at an angle above the hook. Wrap back to the end of the shank, keeping the yarn directly on top of the hook. Stop winding where the thread is directly above the back of the barb. 4. Dub a nice, thin, tapered body forward to the point where the original thread wraps end. This leaves the front part of the hook blank. 5. Cut, clean, and stack a portion of deer or elk hair. The length of the hair wing, when tied on, should be equal to the shank. 6. Secure the wing at the exact point where the body ends near the front of the hook, keeping all of the hair directly on top of the hook. It is helpful to put a drop of Flexament on the hook just before tying on the wing. 7. Trim the butts leaving a small stub, in the same fashion as the Elk Hair Caddis pattern. 8. Form a nice small head in front of the wing.
I don’t recommend storing these flies in a box configured with compartments. Rather, they should be stored in a foam or similar box to prevent tangling in the antron material. |
||||||||||||
![]()
Copyright 2005 by Granite Bay Flycasters unless otherwise noted.


