Description
This month, instead of doing a specific fly,
we’re going to do something different: learn
two important tying techniques that puzzle
most tyers. Why? Because, for the July, 2010
Leader, we will build on and use these two
techniques to create an adult Hexagenia,
which is the largest of all of the species
of mayflies. In my view, it would be
difficult to tie the Hex pattern if you have
to learn everything at once; and, to boot,
the article would be laboriously long. If
you want to tie the Hex that will be in the
July Leader, I recommend that you study the
two techniques that follow, and practice
them diligently. The two techniques are: (a)
creating an extended body with foam; and (b)
creating a “dubbing brush” for a pull-over
style fly. Let’s get started.
Tying Instructions
|
-
Creating a foam extended body.
What is
the advantage of an extended body, other
than the fact that it just looks dandy
to the eye of the tyer? First of all, it
enables you to tie a large dry fly such
as the Hex, or a Pteronarcys Stonefly
(commonly called a “Salmonfly) without
having to use a huge, long hook.
Secondly, it creates a nice, natural
looking abdomen. Third, because we are
using foam (in combination with the
hackle-brush, pullover technique), we
achieve additional floatation. There are
other reasons that will become apparent
to you when you tie an extended body
pattern and fish it.
a.
Materials needed
·
A sewing needle about 1.5” in
length.
·
Two millimeter foam
·
8/0 thread to match the color of
the foam
b.
Tying steps
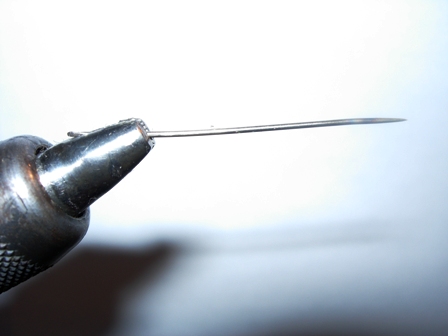
1.
Place the needle in your vise,
with the eye-end inside the
jaws, and clamp it down well.
2.
Cut a piece of foam
approximately Ľ” in width and 2”
long
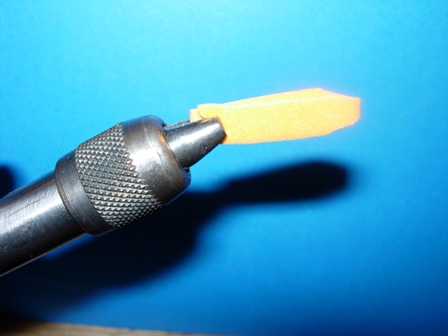
3.
Fold the foam in half and cut a
tapered notch on each side of
the folded end.
4.
Open up the foam and press it
onto the needle in the center of
the notched portion, and slide
the foam back to the vise jaws.
5.
Wrap a small amount of thread in
front of the foam—keep it
sparse; too much thread will
cause problems in removing the
completed body from the needle.
6.
Press the two halves of the foam
together, making sure that the
thread is inside the “sandwich.”
7.
Wrap around the sandwiched foam
3 times, about 1/8” in front of
the jaws; this will create our
first “bubble.”
8.
Take three wraps around the
needle between the two halves of
the foam, moving the thread
forward about 1/8” and repeat
steps 6 and 7. Do this until you
have made at least 5 bubbles,
spaced in equidistant fashion.
9.
When you’ve completed the last
bubble, whip finish at the front
of the most forward bubble and
place a tiny drop of super glue
on the whip finish.
10.
Quickly slide the body off the
needle; if you wait too long,
the super glue may set up
against the needle and the body
won’t slide off.
11.
You’ll notice that you have, in
effect, a duck-bill-like
appendage consisting of the two
foam stubs, at the front of the
body. Trim one of the two foam
stubs off close to the thread
wraps. Taper the second stub to
a point (this will make it easy
to tie to the hook when the time
comes.
12.
Make a dozen bodies. You will
get better at it with
repetition.
|
Creating
a foam extended body:

|
|
|
|
-
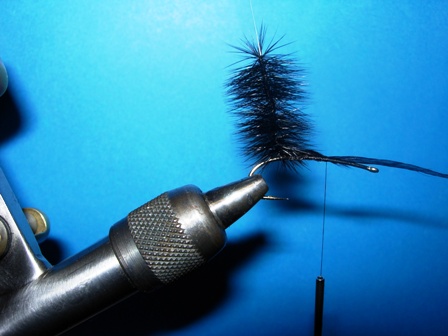
Creating a hackle brush.
What is a
hackle brush? It is up to 40 (sometimes
even a few more) wraps of hackle around
a core such as monofilament,
fluorocarbon, flex floss, or similar
material. It is used in tying
“pull-over” style flies. Certain small
patterns (notably some of Bob Quigley’s
gems) require only a few wraps; large
patterns, such as the Hex we will tie in
July, require 40 or so wraps. As
indicated below, you will need to have a
gallows tool for your vise in order to
do pull-over hackle brushes.
a.
Materials and tools needed
·
Hook (any variety will do for
practice purposes)
·
4x monofilament
·
8/0 thread to match body color
·
Dry fly quality saddle hackle
(long, narrow, shiny), color to
match body
·
Gallows tool for your vise
b. Tying Steps
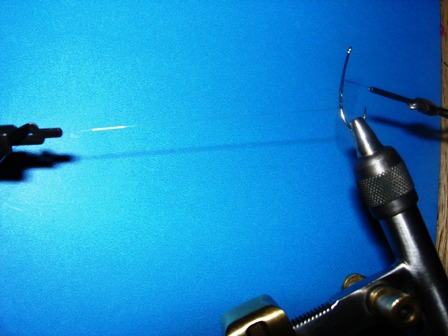
1. Cut
a 1’ long piece of 4x
monofilament or fluorocarbon and
tie it on the hook securely at
the end of the shank. Attach the
other end of the material to
your gallows tool, making sure
that the material is taut. If it
is too loose, wrapping the
hackle will be very difficult.
This will be the hackle post.
Place a drop of super glue on
the wraps.
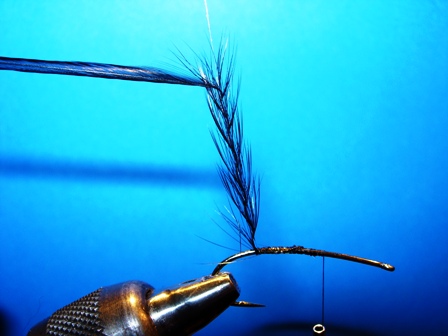
2. Tie
in a saddle hackle at the base
of the post and take 5 or 6
widely spaced wraps of hackle up
the post. This step should cover
about 1” of the post.
3. Begin
winding down the post with
tightly spaced wraps; at the end
of each wrap gently pull the
hackle upwards to seat it
against the prior wrap. If you
have done this correctly, you
should be able to get around 40
wraps around the post before
hitting the shank.
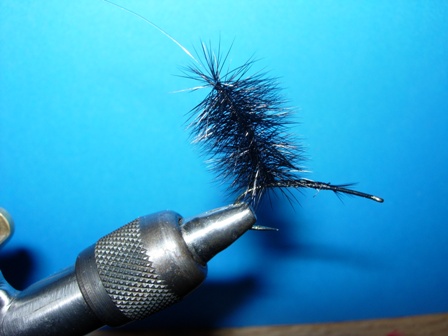
4. At
the end of the last wrap, pull
the hackle forward along the
shank and tie it down with a few
wraps.
5. Cut
the post, leaving a tag of about
1”; you will need this tag in
order to pull the hackle brush
forward across the top of the
abdomen when we tie the Hex fly.
6. Pull
the brush rearward, and wrap the
thread back to the base of the
post. For now, just whip finish
there. The hackle brush is
complete.
7. As
in the case of the extended
body, practice this by doing it
at least a dozen times. You will
become proficient with it
rapidly if you do so.
|
Creating
a hackle brush:
 |
|
|
|
|
 |
|