Description
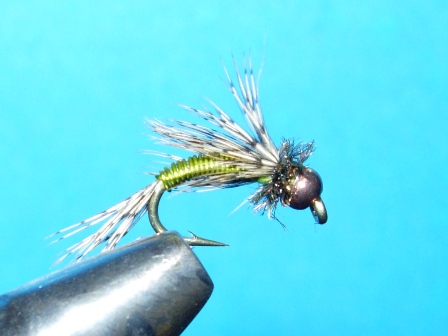
No, the fly’s name, the Peatridge Hotwire
Soft Hackle, is not a typo. I named it
“Peatridge” because two of the main
ingredients are partridge and peacock. The
“hotwire” part comes from the type of wire
used for the abdomen. I am partial to the
soft hackle configuration because it can
also serve as a nymph—in effect, a
two-for-one fly. The soft, wavy hackle
appears to be enticing to fish, especially
on the swing when the fly rises up in the
water column, making it resemble a swimming
nymph on the way to emergence.
Of course, all of this is guesswork (albeit
somewhat educated), since I’ve never had the
pleasure of interviewing a trout. Let’s face
it—a good deal of the art of fly tying is
more for the pleasure of the angler than
anything else. That said, once in awhile we
do land on a pattern that really does work.
It’s at that point that we tyers begin to
invent reasons why the fly is
effective—there’s plenty of pontification
out there, for sure. But we really don’t
know what it is that triggers a trout’s
instinct—and we’ll likely never know.
In any event, this month’s pattern is one
that does indeed entice trout. Why? Quien
sabe, but my guess is that it just looks
buggy, and has some motion to it. Not very
cerebral, but it’s the best I can do. The
fly can be tied on any standard nymph hook,
but I prefer the “scud” type of hook which
allows for a more natural shape to the bug.
Tying Instructions
|
|
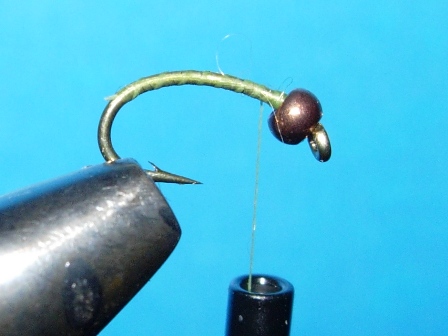
1.
Crimp the hook barb and place
the bead on the hook. Cover the hook
shank with a single, flat layer of
thread; extend the thread halfway
down the bend of the hook. Move the
thread back to behind the eye.
|
 |
|
|
|
|
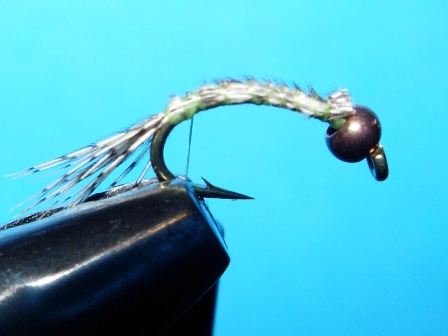
2.
Cut a small section of partridge
feather barbules; use the feathers that
are well-marked. Measure the tail fibers
so that they protrude from the rear of
the hook approximately 1/8”. Tie the
bunch in just behind the bead. Hold the
bunch up above the hook as you work
rearward, ending mid-bend. This
technique will keep the bunch right on
top of the hook. Leave the thread at the
rear, and clip the excess feather behind
the bead.
|
 |
|
|
|
|
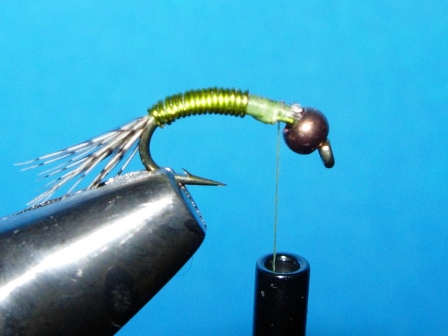
3.
At the same point, tie in a
4” section of wire and wrap the
thread forward to the back of the
bead. Make sure that each layer of
thread lies flat in order to avoid
build-up of thread which results in
a bulky body. Wrap the wire forward
in tight turns and tie it off about
two hook eye’s width behind the
bead, thus leaving room for the
hackle and the head.
|
 |
|
|
|
|
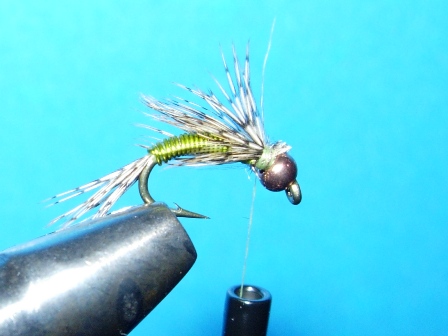
4.
Cut another bunch of
partridge—larger than the tail
bunch. Measure it with tips pointing
rearward, so that the tips extend to
the point of the hook. Place it on
the hook just ahead of where the
wire was tied off, and tie it in
using two loose wraps. Pull the
thread tight; that should distribute
the hackle evenly around the hook.
If it looks too sparse, add another
bunch, but don’t over-do it. Sparse
is good.
|
 |
|
|
|
|
5.
Cut two pieces of peacock herl
from the eye area of the feather; this
part of the feather contains colorful,
very small barbules. Tie these two
pieces in by their tips and take 3 or 4
wraps. Tie it off and whip finish. Place
a tiny drop of superglue on the end of
your bodkin, and cement the thread. |
 |
|
|
|
|
Tying Tips
1.
Keep the fly sparse, and
avoid a thick body. Mayfly
nymphs are very slender.
2.
I like to flatten the
part of the wire that will be
tied in so as to eliminate
excessive bulk when building the
body. Use flat-nosed pliers for
this purpose.
3.
Use your bodkin to apply
superglue rather than squeezing
a drop from the bottle directly
onto the fly. Your placement
will be much better.
4.
I keep a cloth next to my
vise for wiping the bodkin clean
after each application of
superglue to prevent glue
buildup on the needle. If you do
get buildup, use a lighter to
burn the buildup off.
Now, go crank one of these bugs,
go fish it, and…as Ryan Miller
says, when in doubt….go fish!
I live by that simple
philosophy.
|
|
|
|
|
 |
|