Description
Ralph and Lisa Cutter, who live in Nevada
City, California, are the owners of the
California School of Fly Fishing. They have
traveled extensively, and have accumulated a
vast amount of information about fishing in
the Sierra and the foothills. They recently
produced, after years of underwater
research, a startlingly informative DVD
called “Bugs of the Underworld.” I purchased
a copy as soon as it hit the market. It’s a
video that every fly fisher should make a
point of viewing. Ralph has also authored
the
Sierra Trout Guide (first and second
editions), and a fine little book bearing
the title
Fish
Food. I highly recommend
Fish
Food as a primer on the important bugs
that inhabit the waters we frequent. I have
read it numerous times myself, and have
found it well written, informative, humorous
and interesting.
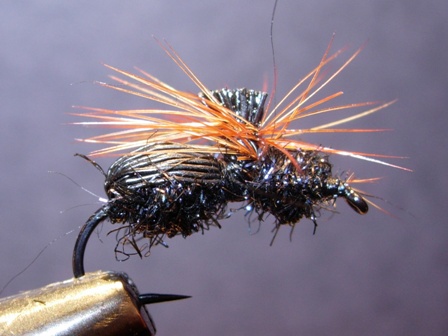
Ralph concludes that ants — principally
Carpenter Ants — are a major staple in a
trout’s diet. He tried various ant patterns
and found them unsatisfactory, finally
settling on a specific pattern of his own
design. Apparently it worked well — hence
the name “Perfect Ant.”
Personally, I enjoy fishing ants in small
streams, especially where there are downed
streamside trees —great ant habitat. The
Perfect Ant is a dry fly, but if it sinks it
will still be effective since trout can’t
resist a properly presented ant. If your ant
does sink, let the cast fish out, keep the
drift drag-free, and watch your leader
closely for any indication of a strike.
Tying Instructions
|
1.
Smash the hook barb; if you are
using the “BL” type hooks, this is
already done. Cover the hook with
thread back to the bend (just above
the back of the barb).
2.
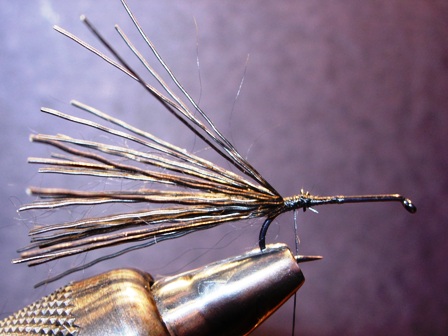
At that same point, tie in a small bunch
of black deer hair by the tips (you will
end up clipping the post anyway)
|
 |
|
|
|
3.
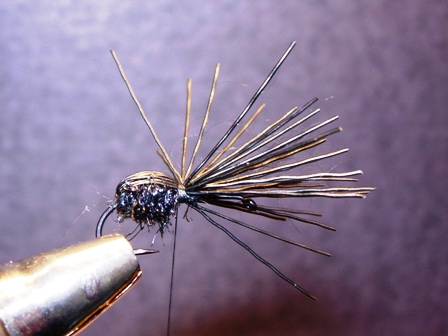
At the same point, begin dubbing the
abdomen into the shape of a ball,
covering the rear half of the hook.
4.
Bring the deer hair over the top of the
abdomen and tie it down at mid-shank,
directly in front of the abdomen.
|
|
|
|
|
|
5.
Pull the deer hair upward and take
about 6 or 7 wraps of thread around
its base, so that it stands up
vertically. This forms the post for
the hackle.
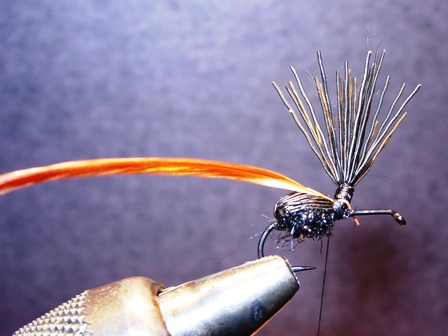
6. Tie in a dry-fly quality neck or saddle
hackle of the appropriate size. It
should be tied down securely both in
front of and behind the post.
|
 |
|
|
|
7.
Grab the hackle with your hackle pliers
and take three wraps of hackle around the
post; tie the feather off in front of
the post.
8.
Dub the thorax of the bug in front of
the wing post. You will need to pull the
post and hackle rearward to do this. The
thorax should be smaller than the
abdomen (that’s the way an ant’s body is
shaped).
9.
Whip finish and apply a small drop of
super glue to the head, and on the
underside of the hook where the post was
tied in.
10.
Trim the post down so that it sticks up
past the hackle slightly. This will keep
the fly from being top-heavy and out of
balance. Add a tiny drop of super glue
to the top of the post.
|
 |
|
|
Tying Tips
1.
In step 6, mention is made of a
hackle of “appropriate size.”
In
dry fly parlance, this means a
hackle with barbules that are about
1.5 times the size of the hook gap.
2.
Why use only 3 wraps of hackle? This
fly is not meant to float high and
dry; rather, it needs to be down in
the film, even partially submerged.
That’s the way that ants appear to
the trout.
Remember to tie sparsely, and…..See
ya on the creek (which is where I
was today).
 |
|

