 |
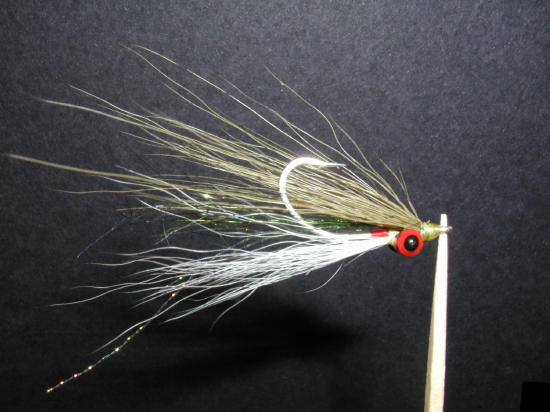
Clouser Minnow
Clouser Minnow
Tying Tips, Dec. 2007
Bill Carnazzo
The
Clouser minnow was created by Bob Clouser, an eastern fishing guide.
He later collaborated with Lefty Kreh, and together they refined
Bob’s initial design, naming it the “Clouser Deep Minnow.” Now
it’s called the “Clouser Minnow,” or just “Clouser.”
Whatever name you give it, the Clouser catches fish…Largemouth and
Smallmouth Bass, Striped Bass, trout, and numerous saltwater
species.
The
Clouser’s design causes it to ride with the hook bend upside down,
creating a naturally “weedless” unit. It’s also lean and
mean…i.e., it should be tied sparsely with supple materials, to
imitate a frantic bait fish. After tying a Clouser, fish it close in
to observe its movement. The heavy “eyes” cause it to dip and
rise with the strip, and the bucktail and flash undulate enticingly.
Fish find it hard to resist this creature…so let’s crank one or
two. While the Clouser is relatively easy to tie, each step is
important, and proper material selection, quantity, placement are
critical to imparting fish-tempting action to the fly.
|
|
INSTRUCTIONS
-
Cover front 1/3 of hook with thread. At about
the 1/3 point, make two slightly spaced “lumps” of thread to
serve as banks to align the eyes.
-
It is important that the eyes be placed at the
1/3 point, or even a bit farther back on the hook, in order to allow
tying room in front of them for attaching and securing the buck
tail.
-
Place the bar bell on top of the hook between
the 2 thread lumps and wind tight turns over its center, using a
figure-eight motion. Use plenty of turns, and then secure the eyes
with a drop of super glue. Whip finish and paint the eyes red, with
a black dot in the center of each eye. Do a number of these and set
them aside to dry.
-
Re-attach the thread, leaving it directly
behind the eyes. Cut a sparse section of white buck tail, and
measure it to equal around 2 ½ times the length of the shank.
Don’t stack the hair, and don’t trim the butts.
-
Tie in the buck tail just behind the eyes. Be
sure to keep the buck tail on top of the hook. The butts should now
be pointing out over the eye of the hook. Move the thread forward so
that it is directly in front of the eyes.
-
Bind the butts of the buck tail down in front
of the eyes, and trim the remaining portion of the butts. Keep hair
out of the hook eye.
-
Rotate the vise (or turn the fly over), so that
the eyes are now on the bottom and the hook point is facing up. Tie
in several strands of flash in front of the eyes, and trim it at
random lengths so that it blends into the white buck tail.
-
Cut a small bunch of olive or chartreuse buck
tail (don’t stack it), and attach it in the same place as the
flash. Tie down the butts securely, keeping the eye of the
hook free of hair.
-
Apply super glue or head cement to the head,
and whip finish. It is also a good idea to apply a flexible cement
such as Dave’s Flexament to the white buck tail where it bridges
the bar bell eyes, as this is a weak point that won’t survive a
fish-attack. If you don’t take this extra step, the fly will look
like it has a spike hairdo after one or two fish.10.
Hint:
if you want to imitate a bluegill, try adding a tiny batch of yellow
buck tail after tying in the flash, and before the upper wing is
attached.

Copyright 1998 by Granite Bay Flycasters unless otherwise noted.
|


