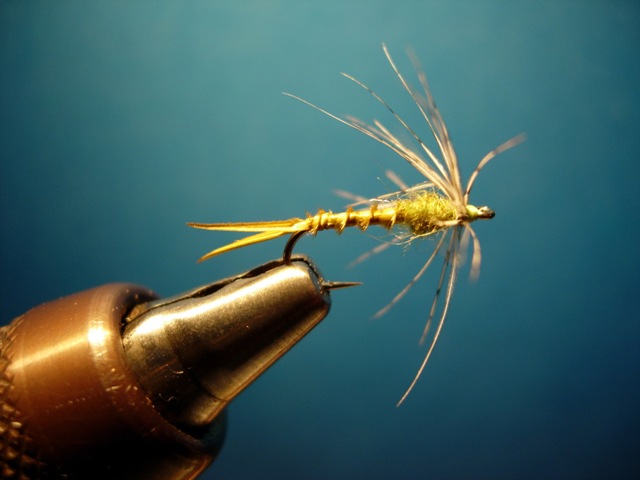
Last month we featured the Snowshoe Biot Emerger, which is a floating emerger—meaning it suspends in the surface film with at least part of the fly visible above the surface. Within the generic term “emerger,” there are fly patterns that actually don’t float, and are designed to be fished differently than their floating cousins. These patterns are like the traditional “wet fly,” designed to be fished sub-surface.


Traditionally, wet flies have been fished in a manner that makes the fly resemble an insect swimming and/or rising to the surface to hatch. An example of this is the old “Liesenberg Lift” technique. There is a lot of very interesting and hoary tradition to wet flies and the manner in which they are fished. For their technical and entertainment value, I commend you to such wonderful works as Nymph Fishing for  Larger Trout, by Joe Brooks; Trout, by Ray Bergman; and Nymphs and the Trout, by Frank Sawyer, to name but a few.


For our purposes, this month’s fly represents the genre of emergers that are in reality wet flies, or “soft hackle flies,” as they are sometimes called. (Sylvester Nemes has written a series of excellent books on soft-hackle flies). As I have repeatedly said in this column, simplicity is divine—nothing is better than being able to crank out a dozen bugs in that last hour before running out the door to fish. The Biot Emerger can be tied in many colors and combinations. For the contest, let’s use olive as the basic color of the fly.


In each issue, American Angler magazine features a column by Dave Klausmeyer called “Klausmeyer’s Quick Fly.” Dave presented this pattern in a recent issue of the magazine.

Materials


Hook

Standard dry fly hook,  such as Tiemco 100; common sizes are 10-18.

Thread

8/0 pre-waxed, color to match body (here olive)

Tail

Olive turkey or goose biots

Abdomen

Olive turkey biot

Thorax

Fine olive dubbing, such as “Fine & Dry” by Spirit River

Hackle

Brown partridge hackle dyed olive

Weight

.015 lead wire or non-lead substitute

Head

Thread


Tying instructions


1. Place the hook in the vise and smash the barb. Wrap the front half of the hook with the weight-wire, leaving a space behind the eye enough to make the head. Cover shank with thread base.


2. Tie in two biots for the tail, with the concave curve facing outward. The tail length should equal the hook shank length. Wrap down the butts securely and smooth out the abdomen with thread.

3. Tie in a turkey biot at the tail tie-in point, which is just above the back of the barb. Wrap the biot forward, with the concave curve of the biot facing away from you. Tie it off at a point 1/3 of the shank length behind the eye.


4. Dub a small thorax; it should be slightly thicker than the abdomen. Leave the head area entirely free of thread and dubbing.


5. Tie in the partridge hackle just in front of the thorax. It should be tied in by the tip of the feather, as this makes it easier to wrap. Take one or two wraps of the hackle and tie it off. Clip the excess.


6. Whip finish and cut the thread. Form a nice small thread head on that area that you have (hopefully) left open, whip finish, and cut the thread. If desired, add a drop of head cement to the head; make it a tiny drop, or the glue will leach into the hackle and make it stiff—which is just the opposite of the desired effect.


      Read up on how to drift a soft hackle or wet fly, and…see ya on the creek!

Copyright 2006 by Granite Bay Flycasters unless otherwise noted