Description
The Swimming Starling Sally was
featured here last month. In that article I
briefly referred to a subspecies of the
little yellow stonefly that will actually
transform into an adult in the water column,
contrary to the habit of all other
stoneflies. That information was garnered
from Internet articles authored by respected
entomologists. What I didn’t mention is that
there is no general consensus among
scientists on this point. For example, Ralph
Cutter, I believe (based on what he says in
his excellent book, “Fish Food,”)
would disagree with such a conclusion. In
any event, it matters not one whit and I
don’t know who is correct—the fact is that
the soft hackle pattern works.
This month, let’s look at the adult insect
for clues as to how to create an effective
floating imitation. That is the regimen that
I follow when I sit down to design a new
pattern. The adult Sally is very delicate,
tiny, and slender. Its wings are gossamer,
and its body is a pale yellow hue (with some
variations). These characteristics render it
nearly invisible when it is in the surface
film. In flight it is somewhat more visible
because of those same characteristics that
make it difficult to see on the water—i.e.,
its pale colors reflect light against the
sky and landscape. Still, as pointed out
last month, it is readily and regularly
mistaken for other insects.
So how do the Sally’s characteristics affect
fly design? Obviously pale colored materials
are required, but it is the manner in which
those materials are applied that is
critical, and somewhat less obvious. What it
takes is actual, close-up observation and
attention to detail. The watchword is
sparseness—overdressed flies will be ignored
by picky fish.
Using those principles as design guidelines,
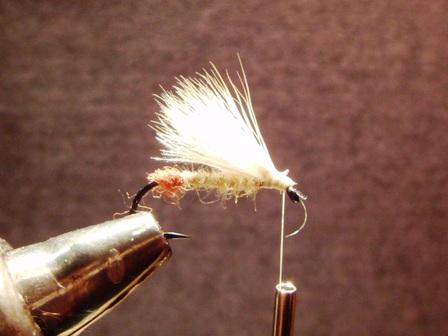
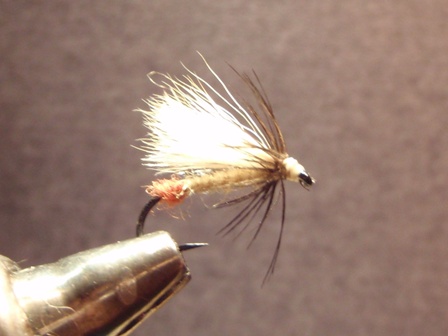
I came up with the Starling Sally dry fly.
This pattern employs a new design concept: a
marriage between a soft hackle fly and a dry
fly. The hackle is starling, which of course
is not intended to aid flotation; rather, it
allows the fly to lie flat within the
surface film with legs that move about,
imparting some motion to the bug. The fly
sports an egg sac made of fine rust colored
dubbing (red is too bright), and utilizes
the same pale yellow-olive dubbing as the
nymph for the abdomen and thorax. The
ribbing is fine gold or copper wire, to
mimic body segmentation. The under wing is
pale yellow CDC, and the over wing is fine
(for translucency) deer hair in a pale
yellowish color. Let’s sit down and crank a
few.
Tying Instructions
|
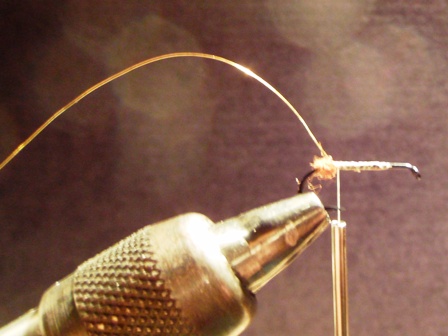
1.
Smash the hook barb; if you are using the “BL” type hooks, this is
already done. Cover the hook
with thread back to the bend
(just above the back of the
barb).
2.
At that same point, tie in a tiny ball of rust colored dubbing for
the egg sac, and then the gold
wire for the ribbing.
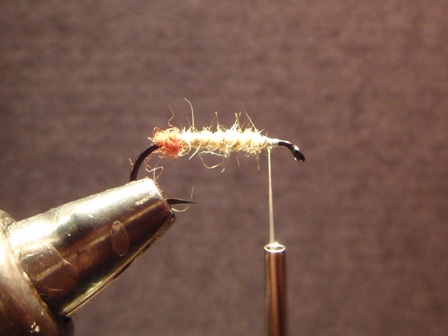
3.
At the same point, begin dubbing the body forward in a nice slight
taper. It is important to keep
the body slender but achieve a
slight cigar-shaped taper as you
proceed forward. Stop at the 1/3
point on the hook.
4.
Rib the body with 4 or 5 turns of the gold wire and tie off the
wire at the front of the body.
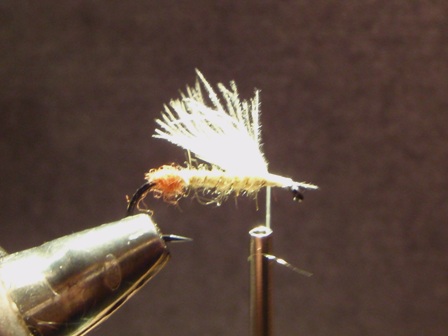
5.
Take two similarly shaped CDC feathers, lay them together, and trim
the butts so that what remains
is the tips of the feathers;
they should be no longer than
the hook shank. Tie them in just
ahead of the abdomen, and don’t
crowd the hook eye.
6.
Cut, clean, and stack a small bunch of fine deer hair. Trim the
butts so that the hair length
equals the hook shank. Tie the
hair in at the same point as the
CDC was tied in, tightly
securing the butts. Add a tiny
drop of super glue to ensure
that the CDC and deer hair
remain directly on top of the
hook. Again, don’t crowd the
hook eye.
7.
Dub a sparse thorax around the base of the wing.
8.
Prepare a starling feather (see below) and tie it in by its tip,
just in front of the thorax.
Since the fly is designed in the
soft-hackle style, the concave
side of the feather should face
the rear of the hook.
9.
Wind the feather around the hook at least 3 times, sweeping the
barbules back on each turn. Tie
the feather off just behind the
hook eye, trim the excess, and
wind the thread in close wraps
rearward to help sweep the
hackle backward. Whip finish and
apply a small drop of super glue
to the head.
|
|
|
Tying Tips
You will note that some of the steps for this fly resemble those for the soft
hackle pattern. This is intentional, as it makes for easier tying and fewer
necessary materials. The following tips were included last month but because
they apply also to the dry fly version, I have included them again here for
convenience.
1.
Starling feathers from the neck area have an iridescent black shine
and a tannish tip. These are the
feathers you should look for.
2.
To prepare a feather for a soft-hackle fly, there are several
methods that have been written
about. I prefer to follow these
steps:
a.
Strip the fuzz from the butt end of the feather, but don’t cut the
stem.
b.
Isolate the feather’s tip by grabbing it with a pointed tweezer and
sweeping the remaining
barbules rearward.
c.
Tie the feather in using the isolated tip as a tab.
Remember to tie sparsely, and…..See ya on the
creek (which is where I’m headed
today).

|
|

