|
|
|
|
||||||||||||||
|
Materials
|
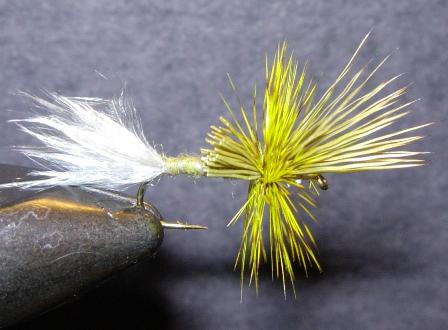
BWO Quigley Cripple (Baetis Emerger)
Last
month we tied the Baetis nymph. This month we will work on the Baetis
emerger. Just what is an “emerger"? I’ve never seen a fly tyer’s dictionary.
Fly tying books usually contain a glossary listing “defining” a few terms. But if you examine the glossaries
of other manuals, you will almost always read a different “definition” of the
same term. Over the years, two usages of the term “emerger” appear to have
emerged (lousy pun). Note that I used “usages” rather than “definitions,”
because there is a difference. As opposed to the formality of a definition, a
usage is more of a common understanding—which, in a nutshell, is how we fly
tyers view the world. We don’t like hard and fast rules. Maybe that’s why you
won’t find a true dictionary of fly tying terms—and I suspect it’s better
left alone. But I digress.
The first usage involves imitation (suggestion) of
that stage of the insect during which it transforms itself into an adult. The
process differs among the principal trout foods—Mayflies, Caddis flies,
Stoneflies, and Midges—but the common factor is the act of transformation.
For example, visualize a Mayfly struggling in the surface film to free itself
from its nymphal shuck. The other usage relates to the hapless insect that
cannot complete emergence, and is stuck in its shuck. Probably a better term
for this unfortunate situation is “cripple;” many tyers use this term, and
you will find it used in the literature. Trout key on cripples—maybe even
more than insects still in the emerging stage—because they are easy prey. Happily, many flies that are called “emergers” are designed vaguely enough to be suitable imitations of both transitioning nymphs/adults and cripples. The BWO Quigley Cripple meets that test. The Quigley Cripple is as old as dirt. I have used QCs successfully for trout, bass and other panfish, and for steelhead on the lower Yuba River. It’s a natural for an emergent BWO. |
|||||||||||||||
|
Tying instructions: 1.
Smash the barb. Cover the back 1/3 of the hook
with thread. 2.
Tie in the trailing shuck. It should be somewhat
sparse, and the length of the hook shank. 3.
Tie in the gray thread (ribbing material) at the
same point, and push it to the rear and out of the way for now. 4.
Dub a very sparse, tapered abdomen, stopping at
about 1/3 of the shank length behind the eye of the hook. 5.
Rib the abdomen with several turns of the gray
thread. Hint—wrap the ribbing in the opposite direction that you wrapped the
dubbing; it will tend not to sink into the body. 6.
Cut a small bunch of the elk hair and even the
tips in your stacker. Measure the tips to equal the length of the shank, and
tie the hair in directly on top of the hook at the point where the body ends.
The tips of the hair will be pointing out over the hook eye. Pull them up and
take several winds at the front base of the hair so that the hair protrudes
forward at a 45-degree angle to the hook. Trim the butts of the hair so that
you leave an amount equal to the middle third of the hook. This is designed
to mimic the remaining wing case. 7.
Tie in a hackle dry fly style just behind the
wing. Make 5 or 6 winds and tie it off there. 8.
Move the thread to the front of the wing and form
a nice small head. Whip finish and trim the thread. |
||||||||||||||||
![]()
Copyright 1998 by Granite Bay Flycasters unless otherwise noted.


