Description
Skwala
stoneflies begin to emerge soon after the
first of the year—sometimes as early as
January, depending on weather conditions.
Locally, they can be found on the Lower Yuba
River, above and below the Highway 20
bridge, where trout and steelhead feast on
them. The nymphs have an olive brown to dark
brown coloration with a lighter pale yellow
underside. As is the case for all
stoneflies, they require clean, swift moving
water, and won’t generally be found in slow
moving areas or in spring creeks. Water
temperatures need to reach 45 to 47 degrees
to commence emergence. The nymphs will
travel along the bottom and ascend onto
vegetation or rocks.
Because trout concentrate their attention on
the shallow, faster-moving water, don’t
immediately step into the water before
beginning to fish—in other words, fish the
edges. Mating will proceed along the banks
and the females will hover along the water
surface to deposit eggs. The male adults are
unable to fly, as they do not have fully
formed wings.
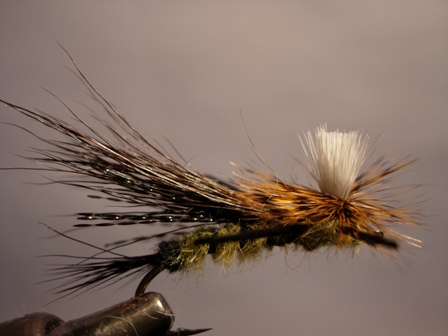
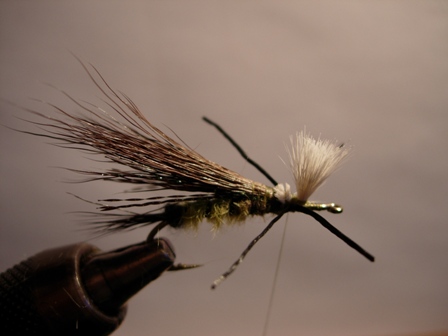
Nymphs are generally tied in sizes #10-12,
and the adults are tied in sizes #8-12.
Yellow Stimulators will work if the wings
are darkened with a black Sharpie pen, but I
prefer this rather simple pattern that has
been effective for me. It has its origin in
a fly tied by one of our long-time members
and angler extraordinaire, Jim Coleman. I
have modified it somewhat, but the credit
goes mostly to Jim on this one.
Tying Instructions
|
|
1. Smash the hook barb unless you are using
a barbless hook. Apply a thin layer of
Flexament on the hook shank and cover the
shank with thread.
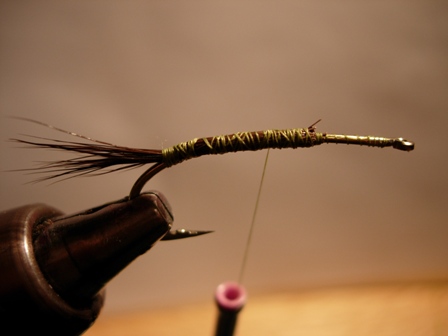
2. Just above the back of the barb tie on a
small clump cleaned (don’t stack it) moose
body hair. The tail should be short, as in
the case of a stimulator. |
 |
|
|
|
|
3. At the same
point, dub a small but prominent ball of black dubbing to imitate the egg sac.
4. At the same
point, tie in a piece of black midge-size V-rib and pull it back out of the way.
5. Dub a medium
sized body of pale yellowish dubbing. I like to mix in a little olive dubbing
with the yellow before starting to apply the dubbing. The body should extend to
near the front of the hook, about 1/3 shank length behind the eye. When dubbing
is complete, use an olive Sharpie to carefully color the top of the body, which
on the natural insect is olive in color. |
 |
|
|
|
|
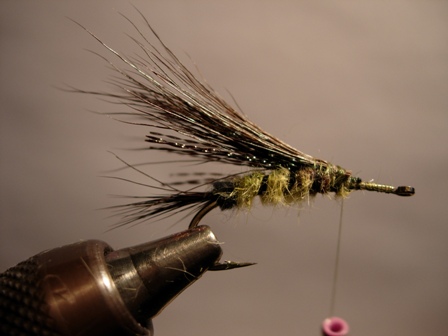
6. Stretch the V-rib so that it is
ultra-thin, and rib the body in evenly
spaced turns; tie off the rib in front
of the body
7. Tie in about 8 strands of black
crystal flash at the front of the body
for an underwing. Cut and clean a small
bunch of moose body hair (don’t stack
it) and tie it in at the same point. The
wing should extend rearward to the end
of the tail. |
 |
|
|
|
|
8. At the base of the wing, tie in a clump
of cleaned calf body or a small bunch of
synthetic white material. Cut the tied-in
hair down to about 3/8”in height. This will
be the post for the brown hackle. See tying
tips below for hints on how to tie this in.
9. Cut a single strand of flex floss and
double it over. Place it over the post and
down onto the shank. Tie it down in front of
the shank with 3 loose turns of thread, cut
the loop, and pull one strand down on each
side of the hook so that the legs form an
“X” shape. Now wrap tightly and apply a tiny
drop of superglue to the bottom of the post.
This will hold everything together.
10. Tie in a dry fly quality saddle hackle
at the base of the post and apply a bit of
dubbing to cover up the tie-in area. Wind
the hackle up and back down the post. Tie it
off behind the eye of the hook, form a nice
small thread head, and whip finish. |
 |
|
|
|
|
Tying
Tips
1. In order to properly create the post and
parachute hackle there must be adequate room
left at the front of the shank. This means
that the body must be ended at least 1/3
shank length behind the eye because the
underwing, the wing itself, and the post
must be tied in ahead of the body.
2. To tie in the post, point
the tips of the material out over the eye and tie in the butts close against the
base of the wing. Once the butts are secured, lift the material up and take a
few winds around its base to “gather” the material. On the fourth wind, pull up
and to the rear, catching the thread in the butts. This will hold the post
vertical. Place a few insurance winds in front of the post.
Fish this bad boy close in to
the bank, either upstream or down. You don’t need to get into the water—just
cast close in and let it drift. I will sometimes raise and shake the tip of the
rod to make the fly skitter a bit—a technique use to imitate the “motorboat
caddis.” Go rip a few lips, and…. |
|
|
|
|
 |
|