|
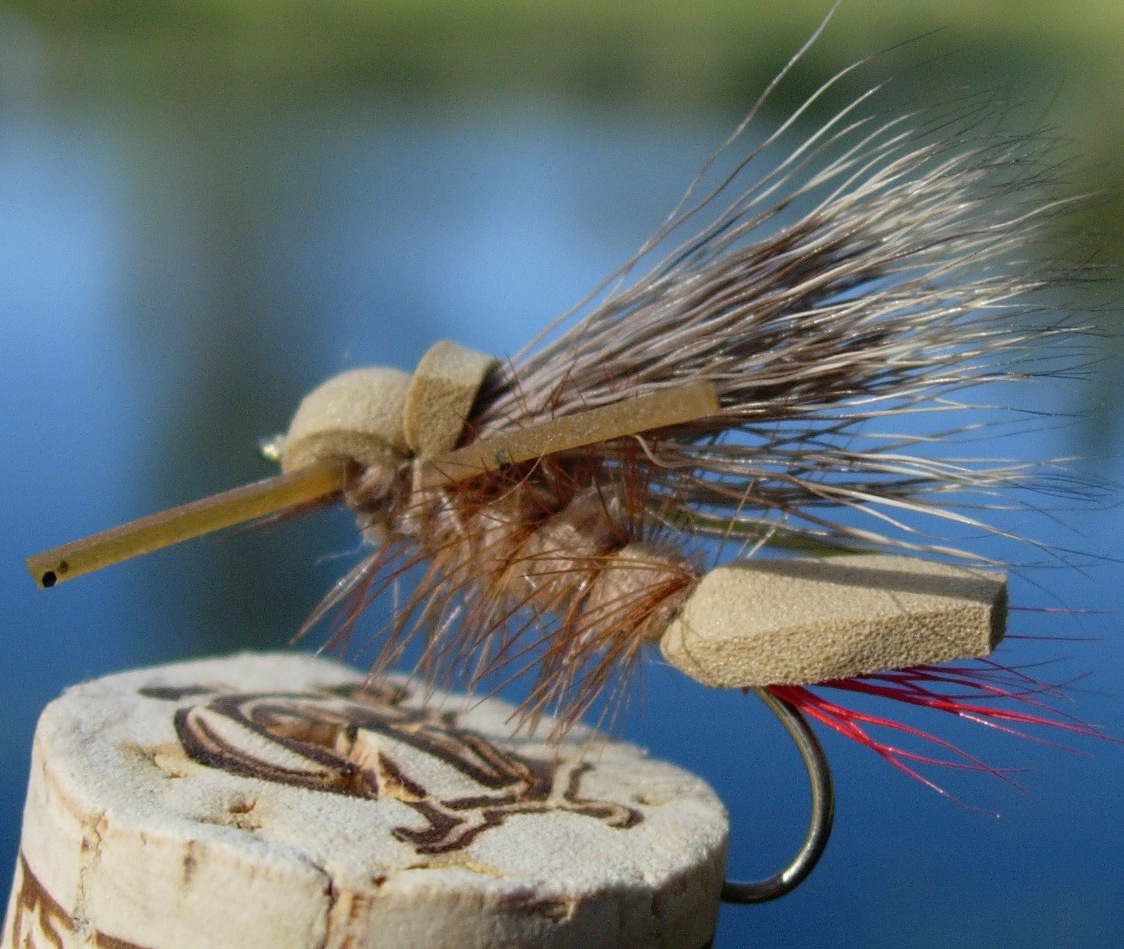
Materials
|
Hook |
Any
hopper hook, 2x long, such as Mustad 94831 or Daiichi
1180, sizes 6-10 |
|
Thread |
8/0
with color to match body of the fly |
|
Tail (optional) |
Red
deer hair |
|
Body
|
Grey, tan, or olive 2mm foam, covered with dubbing
material to match |
|
Dubbing for body |
Sparkly fine synthetic dubbing material |
|
Hackle |
Brown dry fly saddle hackle |
|
Under wing |
Deer hair |
|
Over wing |
Speckled turkey wing |
|
Legs |
Orange and black rubber leg material |
|
Head |
Foam, same as body |
Tying Instructions
-
Cover the
hook shank with thread after de-barbing it. At a point on
the shank just above the back of the now smashed barb, tie
in a very short tail of cleaned and stacked red deer hair.
It should be no longer than ¼”. Note: the red tail is
not part of the original pattern; I added it because I liked
that feature of some other hopper patterns.
-
Cut a
piece of foam about 2 inches in length, and about ½ the
width of the gape. At one end taper with your scissors to a
point. Bring the thread forward to a point that is just
behind the eye.
-
Fold the foam around the shank after making sure that the
pointed end is to the rear and is sticking out about ½ the
length of the red tail. Tie in the foam just behind the eye,
and move the thread rearward about 1/8”. There take two
wraps around the foam. Repeat this process until you reach
the rear of the hook. This forms a nice segmented body.
Leave the thread hanging there for now. Note: at this
point, about 1 inch of the foam should be extended out over
the hook eye. Don’t cut it off.
|
-
Tie in a good dry fly saddle hackle; brown is best for this
purpose. Apply dubbing to the thread, and move the thread
forward, winding it into the creases that form the segments so
that there is a nice dubbed look to the body. Palmer the hackle
up to about the 1/3 point behind the eye and tie it off there.
-
Cut, clean, and stack a pencil-and-a-half size clump of deer
hair for the under wing. Measure it so that it extends to the
end of the red tail, and clip the butts. To make the hair stay
under control and on the top of the hook, take one wind around
the butts before putting the hair on the hook. Move the hair and
thread to the hook and tighten it. Use 5 or 6 good tight turns
to lock the wing down. Trim any excess and move the thread to
the base of the wing.
-
Cut a strip of
turkey wing about 3/8” wide. Apply a coat of Flexament and let
it dry well. Hint: if you’re doing (as you should) a half dozen
(at least) of these, cut and coat the strips all at one time.
-
Shape the wing
so that the rear is tapered round. Apply a coat of Flexament to
the butt end of the under wing and lay the turkey wing on top of
it. The end of the wing should match that of the under wing.
Take several wraps around the butt end of the turkey wing to
secure it atop the under wing.
-
Tie in the
rubber leg material on each side of the hook just ahead of the
turkey wing tie-in point. Note: I will demonstrate a good
shortcut for this at the October general meeting.
-
Apply some
dubbing, if you choose to, of the same sort and color that is
used for the body. It should be wound between the legs.
-
Bring the
remaining foam back over the eye and anchor it down behind the
legs, taking care not to catch up the legs in the winds. This
forms a nicely shaped head. Trim the legs fairly long, with the
rear legs being slightly longer.
-
Move the
thread under the thorax and to the hook eye, where you should
now form a small head and whip finish. Apply a tiny drop of
superglue to the underside of the body, at the point where the
foam was tied down in the last step.
Take a few of these in different sizes and colors and go to
the Lower Yuba. See ya on the creek! |