Description
Last month I featured Bill’s Stick Caddis,
Fall Phase version. Normally in this issue I
would have featured my October Caddis
emerger, which I call Bill’s Emerging Thing.
My plans changed when I read Ken Hanley’s
brand new book, Tying Furled
Flies—Patterns for Trout, Bass, and
Steelhead. This book
will introduce you to some interesting,
valuable, practical techniques for creating
very life-like patterns. Ken's vast
experience and knowledge are brought to bear
on every page; the photography is excellent,
including the instructional sequences; and
it is all woven together with Ken's personal
touches, humor, and insights on everything
from color and hue, outdoor ambiance, and
fishing strategies, to the ruminations of a
most introspectful flyfisher. You'll learn
the history of the ancient technique of
"furling" various materials, how it can be
applied to the world of fly fishing, and how
to tie some very effective, fish-enticing
patterns. A few examples include Ken's Hex
Magic, October Blimp, Pygmy Hopper, Damsel
Teneral, and Furled Alevin. I have
personally used many of these patterns, and
have found them to be simple to tie, and
very effective. I highly recommend Ken's
book not just for the techniques so
beautifully demonstrated, or the many and
varied patterns he has created; mostly, as
an artist of sorts myself, I am fascinated
by the perspective of a respected artist on
this broad and ever-expanding
sport/addiction that we call fly fishing
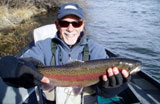
Ken’s October Caddis adult, called the “October
Blimp,” is featured on pages 44-49 of his
book. As soon as I read those pages, I knew
this would be a great fly to share with
members, especially those who plan to attend
our annual fishout on the Upper Sacramento
in October. So, let’s go a-furlin’ and build
some blimps.
Tying Instructions
|
|
1. The instructions for furling the
body can be found in GBF’s fly tying
archive by clicking this link or
copying & pasting it into
your browser's address field:
http://www.gbflycasters.org/fly%20tying/patterns/Ken_Hanleys_Furled_Damsel_files/Ken_Hanleys_Furled_Damsel.htm
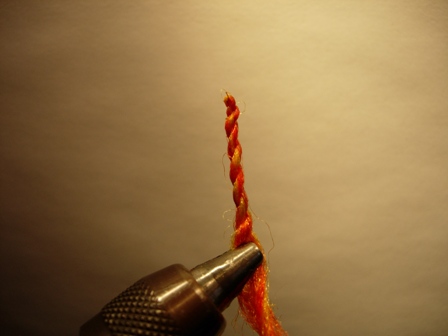
For this fly, you will need to use a bunch of the
fluorescent orange that is about two
matchsticks in width, and a bunch of the
burnt orange that is about half that size.
Lay them side by side and then begin the
furling process. You will achieve a “barber
pole” effect if you do it correctly. This
will be the abdomen of the fly. Prepare at
least 6 of these, and dip them in a bottle
of Softex which helps prevent fouling of the
abdomen on the hook point by stiffening the
yarn. Set the bodies aside to dry
completely.
|
|
|
|
|
|
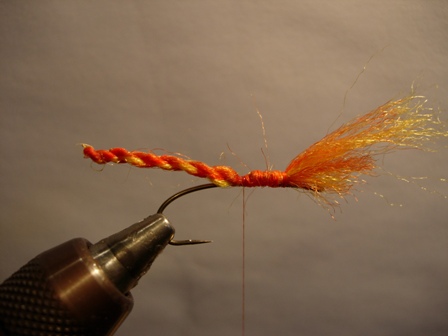
2. Attach the tying thread behind the eye;
wrap a thread base back to the middle of the
shank. Measure the now-dry abdomen to equal
the distance between the eye to the hook
point, and tie it in at mid-shank. Don’t
trim the butts, but comb them out. Place a
drop of superglue at the tie-in point. |
 |
|
|
|
|
3. Tie in a small strand of orange
leech yarn at the same point and
wrap it forward over the Antron
butts. Stop about 3/8” behind the
hook eye and tie it off. |
 |
|
|
|
|
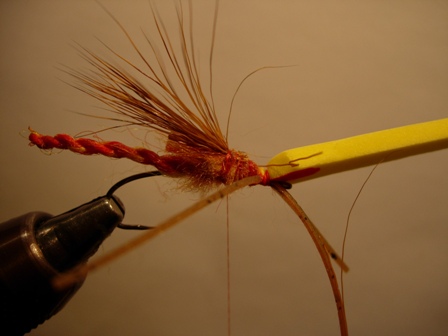
4. Pull back the unfurled Antron
and trap it with thread wraps. Place
a drop of superglue at the point
where you secured it in place.
5. Add legs/antennae on each side of the
hook by tying in a piece of the rubber leg
material just ahead of where you tied back
the unfurled Antron. Tie the leg material
down in the middle of the piece, so that
there is an equal amount pointing forward
and backward.
|
 |
|
|
|
|
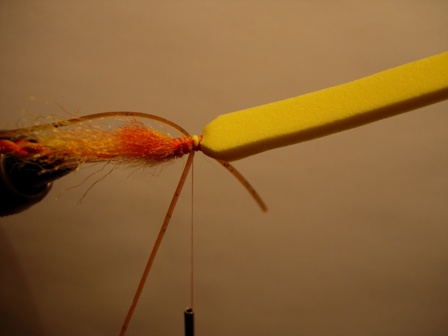
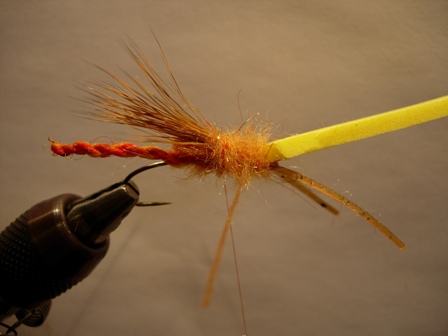
6. Cut a strip of foam about 1 ˝” long and Ľ” wide. Trim one end to a fine
point and with the tip pointing to the rear, lay the foam flat along the front
3/8” of the hook. Tie it in there. |
 |
|
|
|
|
7. Trim the Antron butts so that
they are long enough to reach the
point where you tied in the abdomen.
This is the underwing.
8. For the overwing, cut and clean a small
portion of deer hair. Tie it in at the point
of the foam that you tied in. Advance the
thread to the eye, and add a drop of
superglue to hold all of the material in
place.
|
 |
|
|
|
|
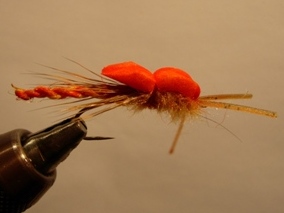
9. Using the orange dubbing, dub a large head. Dub rearward so that your thread
ends up where you tied in the overwing. |
 |
|
|
|
|
10. Pull the foam strip rearward
over the dubbed head. Tie it down
with a few loose wraps and check its
position to make sure it is directly
on top. Make a few more wraps,
increasing the tension with each
wrap. Whip finish and apply head
cement to the wraps.
11. To trim the
foam, Ken recommends laying your scissors on top of the foam; don’t raise the
foam, and make a straight cut. This will leave a slight “dishlike” appearance to
the foam, which acts as a float.
12. Trim the legs at the end of the hook;
the antennae should be about the same
length. If you have used white foam, color
the foam orange. |
 |
|
|
|
|
Tying
& Fishing Tips
1. Prepare at least 6 bodies and tie 6 of this pattern. You
will find that if you do this
(indeed, with any pattern you tie)
your consistency will increase
immensely.
2. Be sure to use 3mm foam in order to achieve the balance
and flotation needed. Fish the fly on the surface or just below for best
results. If you aren’t hooking fish, try suspending an October Caddis emerger
beneath your Blimp.
3. Ken says that this fly is also a good imitation for the
giant Salmon Fly, technically known as Pteronarcys californica.
4. As mentioned above, I highly recommend Ken’s book for a
complete explanation of furling, and the techniques Ken uses.
Fish this beast in the
evenings during the October Caddis hatch, which usually commences near the end
of September, and lasts through the end of the year. Yes, it’s cold, and yes, it
rains and snows at this time. If you don’t like to fish in those conditions,
there are always “bluebird” days during the fall, and even during the early
winter. So, give it a try—you won’t regret it. See ya on the creek. |
|
|
|
|
 |
|