|
Materials
|
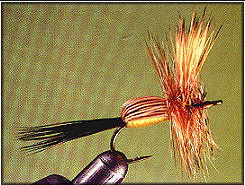
Hook |
Standard dry fly hook, such as Tiemco 100; common sizes
are 14 and 16. |
|
Thread |
6/0
pre-waxed, color to match body |
|
Tail |
Dark elk hair or moose body hair (I prefer moose) |
|
Body |
Thread |
|
Shellback |
Light elk hair |
|
Wing |
Light elk hair |
|
Hackle |
Badger, grizzly, or blue dun, or even a mixture of
grizzly and brown (Adams style) |
|
Head |
Thread |
Tying Instructions
-
Place the
hook in the vise and smash the barb. The key to tying this
fly correctly is to tie the thread on the shank at the
midway point and wrap back to the tail tie in point
(directly above the back of the barb), and promise yourself
that in the following steps you will not tie materials onto
the front half of the hook until it is time to raise the
wing and apply the hackle. If you fail to follow those
suggestions, you will have a front-heavy fly and a very
difficult time finishing it.
-
Cut and
stack a small bunch of moose or dark elk, measure and trim
it to the length of the shank, and tie it in for the tail.
The front ends of the butts should not extend beyond the
back half of the hook (i.e., the front half of the shank
should still be open).
-
Cut,
clean, and stack a small bunch of light elk hair. Trim it so
that its length is twice the shank, and tie it in on top of
the tail material. Cover it with even, smooth thread wraps
to form the underbody. Hold the tips of the hair up as you
wrap rearward to keep it from mixing with the tail, and be
sure to wrap it back to the point where the base of the tail
is—otherwise you will have an undesirable gap there. Bring
the thread forward to that don’t-go-beyond halfway point on
the shank and let it hang there.
|
-
The following
instructions are written in “right hand English.” If you are
left-handed, just reverse the procedure. With your right hand,
pull the elk hair over forming a hump. Grip the hair tightly and
hold it on top so that the fibers won’t slip down the sides of
the fly.
-
With your left
hand, make several wraps in place over the top of the hair. On
the third wrap, pull down tight and wrap forward just a tad a
couple more times.
-
Now grab the
hair with your left hand and raise it vertical; wrap a few times
in front of the wing to lock it into place and stand it up.
Don’t create a big shoulder here, as it will make wrapping the
hackle hard.
-
Split the wing
into two even segments, and x-wrap between them a few times to
separate the segments. Then encircle the base of each segment
with a few thread wraps, pulling to the rear with the last wrap.
This should lock the wing in the vertical plane. If you have
done this right, you will still have a good portion of the front
half of the shank bare, and your wing will be of the proper
length—i.e., the length of the shank.
-
Tie in your
properly prepared hackle behind the wing, locking it down by
also wrapping it a few times in front of the wing. Now we can
cover the rest of the shank with thread. You can use modern
genetic saddle hackle here, or several neck hackles. Just be
sure that the quality is good and that the barbule length is
correct for the size of the hook you have selected.
-
Wrap the
hackle forward, using tightly spaced wraps—three or four behind
the wing, and five or six ahead of it. The Humpy is a heavily
hackled fly, so use plenty of wraps. Hint: if you lay down a
very thin layer of fine synthetic dubbing before wrapping the
hackle, the hackle will stand up better and remain in place. I
also place a tiny drop of superglue on the shank before wrapping
to ensure durability. It also helps to hold the wing back
when wrapping the hackle forward.
-
Form a small
thread head and whip finish.
Drift your
freshly-lubed Elk Hair Humpy through a riffle with a nice, drag-free
float. You can even add a little “stinger” with some fine tippet.
Don’t let it out of your sight, and…see ya on the creek! |