|
|
|
|
|||||||||||||||||||
|
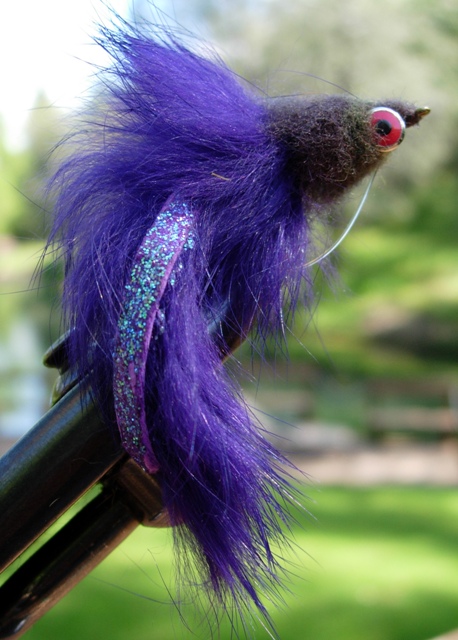
Bill's Bassy Bunny Bass—especially the lunkers—love “bunny leech” flies. There are plenty of bunny patterns out there, and it may be that someone else has already “invented” this fly. However, I’ve never seen one tied quite like my Bassy Bunny. So far this Spring the bigger bass have hit this fly like a bullet train. I’ve tested it on my own ponds, as well as various other lakes and ponds. If I had a boat, I’d test it in the Delta. If I had a Leer jet, I’d try it in New Zealand. Alas, I have neither boat nor jet, but I can dream—can’t I?
Bill’s Bassy Bunny is
made to sink, and sink fast. It doesn’t cast like an Adams, so you’ll need to
open up your stroke and slow it down. But be ready as soon as it hits the water,
because bass will grab it on the drop due to its enticingly wiggling motion
as it falls downward. |
|||||||||||||||||||||
|
Materials
Tying
instructions
Before beginning the fly, lay out several long bunny strips on a piece of cardboard, and tack down the ends so it’s stretched tight. The skin side should be facing up. Using a fine brush, apply glitter paint to the skin down the length of the strip. Set these painted strips aside to dry; they will be cut into smaller pieces and used as tails. The paint should dry clear, leaving only the glitter on the skin. The bunny strips for this purpose should be the straight cut variety (sometimes called “Zonkers”), not the cross-cut type. Unpainted crosscut strips can be used to wrap the body, but the straight type works almost as well.
1.
Smash
the barb. Wrap the lead/substitute wire around the middle of the shank, using
10 wraps. Tie in a 4” piece of monofilament directly on top of, and at about
midpoint on the hook. Continue to tie it down while winding rearward to a
point about 1/3 of the way down the bend. Just let it stick out behind the
hook for now. Bring the tying thread to a point about ¼” behind the eye,
covering the lead and mono with a layer of thread. Coat everything with
Dave’s Flexament.
2.
Invert
the hook and tie in a pair of eyes on the underside of the hook at about ¼”
behind the eye. Use plenty of figure-eight wraps. Coat the tie-in point with
Flexament and return the hook to its upright position. Why tie the eyes in on
the bottom? If they were tied in on top, the hook would ride upside down—in
this case an undesirable result. |
3.
Return
the thread to a point just above the back of the barb. Cut and tie in a 2”
strip of the glitter-painted rabbit, with the glitter side down. At the same
point tie in an unpainted piece of unpainted rabbit strip (the cross-cut type
wraps a bit better, but it is not essential). Wrap the strip forward to just
behind the eyes, stroking each wrap rearward to form a full body. Tie and
trim the strip.
4.
Using a
wire flea comb (available wherever pet supplies are sold), comb out the kinks
in a small section of the ram’s wool on the skin. Cut a small bunch of combed
out wool from the skin and push it longitudinally over the hook to behind the
eyes. Tie it in there, and sweep it back. Using the same method tie in one
more bunch behind the eyes, and several bunches in front of the eyes. Hint:
don’t cut large bunches; a medium sized bunch will tie in and spread around
the hook much better. Leave a bit of room behind the eye.
5.
Whip
finish and cut the thread. Trim the wool from around the eyes, and into a
shape roughly like a sculpin head, blending it into the bunny fur.
6.
Tie the
thread back onto the hook just behind the eye. Bring the mono up through the
eye and wrap it three times behind the eye. Pull the mono up so that the loop
is even with the bend of the hook. Wrap it securely in place, whip finish,
and trim the thread.
7.
Cut the
mono so that it is flush with the eye. Heat your bodkin in a lighter flame
and push the point of the bodkin up through the eye while it is hot. This
will melt the mono in place and clear the eye. Using Flexament, glue the
head. |
||||||||||||||||||||
|
You can
cast this brute with a 5 or 6 weight rod, but use a slow, open stroke. Your
leader should be constructed so that it has a strong butt section. Bass are
generally not shy, so I use a short leader that tips out at 8 or 10 pound
test. A weight forward floater
works well for small ponds that aren’t too deep. An intermediate full sinking line works best for larger,
deeper water. Strip the fly back
with differing retrieves; when the fly gets close to you, watch its seductive
action as it is retrieved. You may want to bite it yourself…
|
|||||||||||||||||||||

![]()
Copyright 2005 by Granite Bay Flycasters unless otherwise noted.